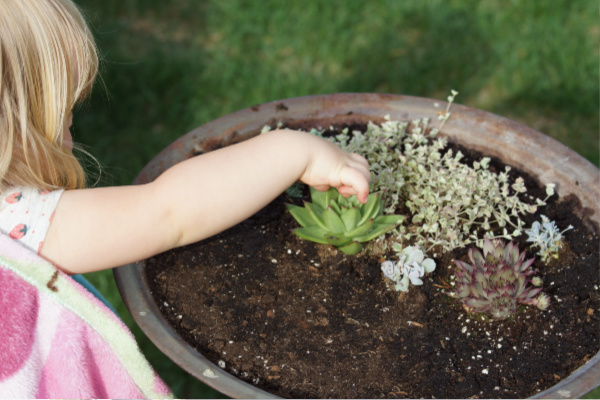
We moved into a new (to us) house a couple of years ago, and this ancient rusty birdbath was sitting in the yard. I never got around to throwing it out, and this year I decided to turn it into a birdbath fairy garden!
Check out our 10 FAVOURITE PLACES for finding the CHEAPEST fairy garden supplies!
(THIS POST MAY CONTAIN AFFILIATE LINKS. YOU CAN READ OUR FULL DISCLOSURE POLICY HERE.)
![]()
This was a really simple project that took about 25 minutes total and cost about 40$. It could have been cheaper if I had used free plants, and on the other hand, it could have been more expensive if I had had to buy the birdbath (altho, you CAN get them cheap).
I thought 40$ for this little birdbath fairy garden was ok for the way it turned out!
DIY Birdbath Fairy Garden
Because the space was really small and the birdbath was really shallow, I decided to use succulent plants only – that way it didn’t matter if there wasn’t a ton of “root space”. (Here’s a very in-depth guide to fairy garden plants if you’re struggling to choose!)
(This is very different than a deeper fairy garden container – like a washtub fairy garden for example – because there the plant roots have TONS of room and you can use much larger or heavier plants!)
I put about 1.5 inches of dirt into the bottom of the birdbath and placed all my plants towards one side of it, to leave an area for the fairy garden.
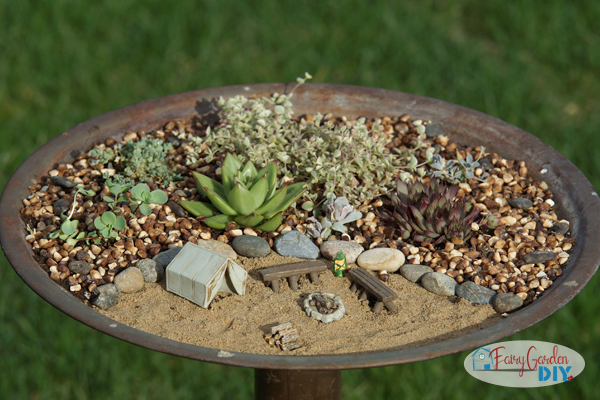
The succulents gave it a “desert-y” feel, so I decided this was probably a fairy campground more than a fairy home… I always imagine fairy homes as sort of cozy tucked away areas. This felt too open to be a home. (I’m sure you’ll find that your fairies either are or are not as particular as mine LOL.)
I found an adorable fairy campground set (a tent, two benches, and a lantern) on SALE at the nursery when I was buying plants the other day, and I had just been waiting for the perfect place to set it up!The small area of the birdbath was ideal for the campground. (You could easily use this cute little tipi and this fairy firepit from Amazon, and make use twig “benches”.)
My kids love to help me plant fairy gardens (let’s be honest, one of the main reasons I do this is so that I have a hobby I can enjoy with my kids). If you just want to start a simple fairy garden for kids, read this first!
We placed the ground-cover type plants at the back, and the ones that won’t take up as much space (over time, as they grow) closer to the center. If the ground cover plants start to creep in the wrong direction, we can trim them. I think it will look AWESOME once they start spilling over the edge of the birdbath!
Because I was really into the desert-y theme, I sprinkled sand (from the kid’s sandbox) over the floor of our “campground”, and packed it down.
It sort of looked unfinished tho, just bumping into the dirt – until we added the rock border.
![]()
THEN the dirt looked unfinished, and sort of stuck out…
So I covered it with fish tank gravel – this stuff makes such a difference for fairy gardens! It makes them look so much more tidy + intentional. (You can also use it to create little paths through larger gardens.)
The finishing touch for this fairy campground was a little pile of twig firewood.
Need help setting up your fairy garden? Here’s everything you need to know about making a fairy garden.