DIY Fairy Garden Houses
 My favorite way to make a fairy garden is to start by building a diy fairy garden house.
Check out our 10 FAVOURITE PLACES for finding the CHEAPEST fairy garden supplies!
I just can’t quite imagine that the fairies want to live in those plastic-y store-bought things, I’m sure they want a homemade fairy house haha.
(THIS POST MAY CONTAIN AFFILIATE LINKS. YOU CAN READ OUR FULL DISCLOSURE POLICY HERE.)
Something about the imaginary fairies makes me think that they NEED to be able to live in houses that look like they could have been made by the fairies… you know, whipped up with stuff they can find outside. (I also like my fairy gardens to have real plants for this reason!)
I also like cheap, easy, and long-lasting.
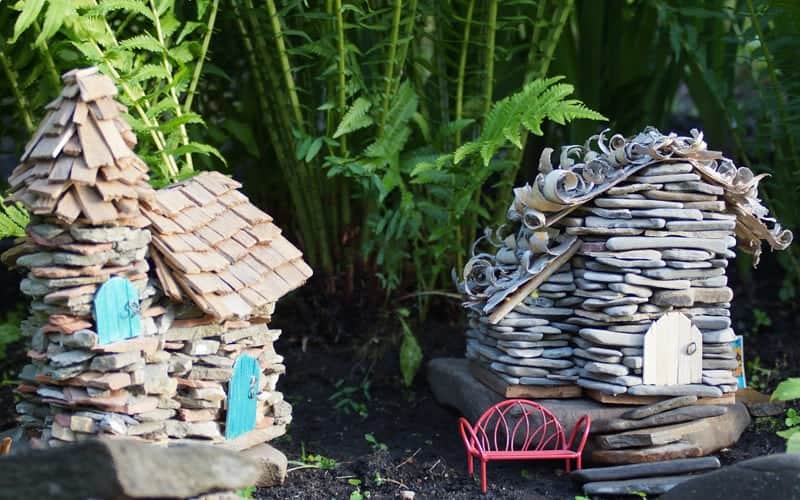
Therefore, these little stone fairy garden houses are my FAVORITE to make.
(I DO make others that are not quite so durable, like this faux brick fairy house, but durable is WHERE IT’S AT!)
These stone fairy houses shouldn’t cost more than 20$ or so (less if you have a tube of silicone lying around), and they don’t require any messy cementing or grouting but they STILL look adorable.
They also stand up well in the elements – unlike the first DIY fairy garden house I ever made – using a hot glue gun.
It literally melted into a puddle of glue and rocks when we had a crazy heatwave last summer. You can not build stone fairy houses to withstand heat with hot glue. Sigh.
Then I tried one where you grout stones to a juice jug – just because it’s the first result on google for how to make a fairy garden house does NOT mean it’s a good way to do it.
Let’s not mind that mixing up and using grout is NOT that easy, but it all flaked off when it was dry because – surprise – you can’t grout to plastic. Apparently. Or at least I can’t.
So I came up with my own way to build stone fairy houses!
(THIS POST PROBABLY CONTAINS AFFILIATE LINKS. OUR FULL DISCLOSURE POLICY IS REALLY BORING, BUT YOU CAN FIND IT HERE.)
How to Make a Fairy Garden House
You’ll Need:
- A bucket of flat little rocks**
- A piece of heavy-duty cardboard
- Scissors (for trimming cardboard)
- A tube of this stuff (this is the “magic” to make them last!)
- (You’ll need one of these to go with that magic stuff)
- “Roofing materials” – birch bark, twigs etc.
- Wood glue
- Popsicle sticks
- Bright acrylic paint & paintbrush (optional)
**(I collected all my rocks and it took hours. For the next house I’m going to go down to the hardware store and see if I can get some of these – hopefully on clearance – and pick the rocks off the backing. I think they will work PERFECTLY.)
How to Build a Fairy House Out of Stones
Use the following directions to build a fairy house out of stones. If you’d rather something different than stones, check out these other DIY fairy house ideas.
Build the fairy house structure:
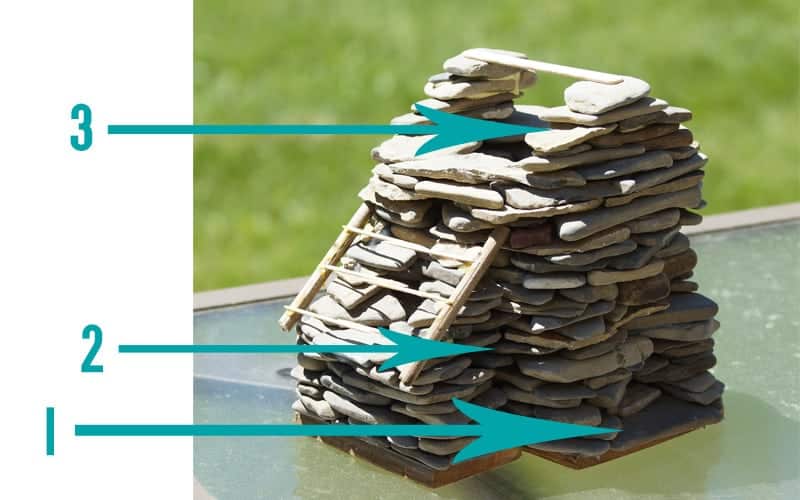
Ok here’s where you’ll have to forgive me, because I forgot to take pictures of this part as I went. But determine how big you want the house and cut your cardboard to that size / shape. I like my houses to have little “rooms” off one side, (although plain old square/ rectangular / oval would be FAR easier).
Use your clear silicone to “glue” the stones together. (The silicone should be weatherproof, so your house will be able to go outside without disintegrating! It seems to have NO problem sticking stone to stone. Woohoo!)
Just a few things to keep in mind when you are “constructing” your house:
1 ) I like to leave a “doorway” where the door will sit on my diy fairy house. I find that cutting a “door” out of a piece of paper to use as a template and build around works well. Then I set the rocks back “around” it. (Otherwise when you stick your door on the front it just sort of hovers there – you can REALLY tell it’s just stuck on, which is fine too. But I like this better.
2 ) If you do add a “room” make sure you build the rocks INTO each other, so that the “room” is integrated right into the house. If you just build it next to the main structure it will fall off. Rocks are heavy.
3 ) don’t worry too much about the “pitch” of the roof, or about filling in all the little holes along the sides. You can fill in holes once the roof is on and you can see what needs more work. Just getting the basic shape is important.
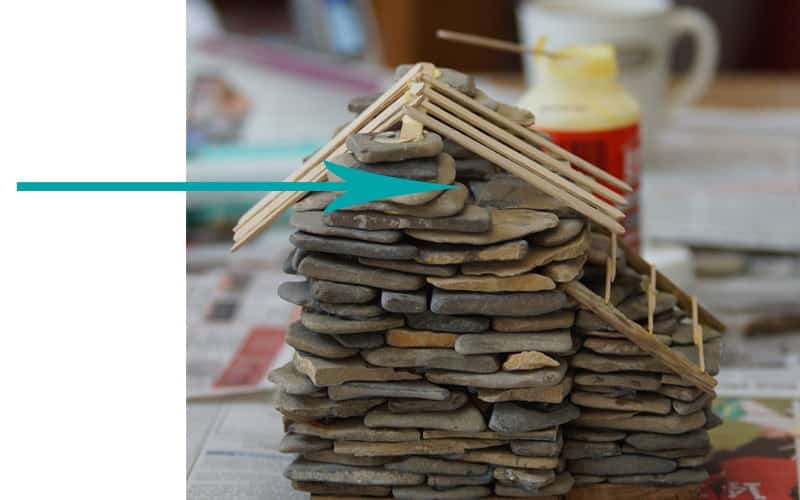
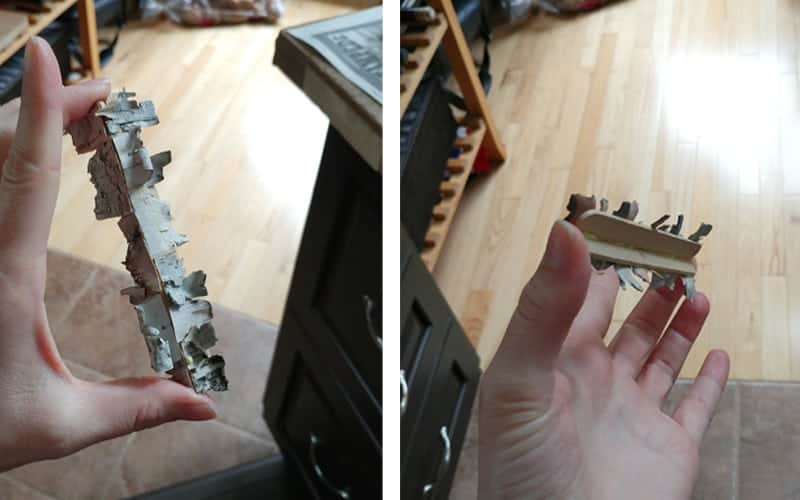
Build a “roof” using popsicle sticks and wood glue.
Here’s a ton of great fairy house roofing material options to choose from!
Again, it doesn’t matter if it’s perfect.
Don’t worry about those holes along the pitch of the roof. You can fill those in later. What matters most is that your popsicle sticks are more or less level with one another & flat to build on.
I also tried toothpicks and sticks from bushes (as you can see) but popsicle sticks are REALLY the way to go.
(Let this “roof” dry completely before you try to “shingle” it. Save yourself the headache.)
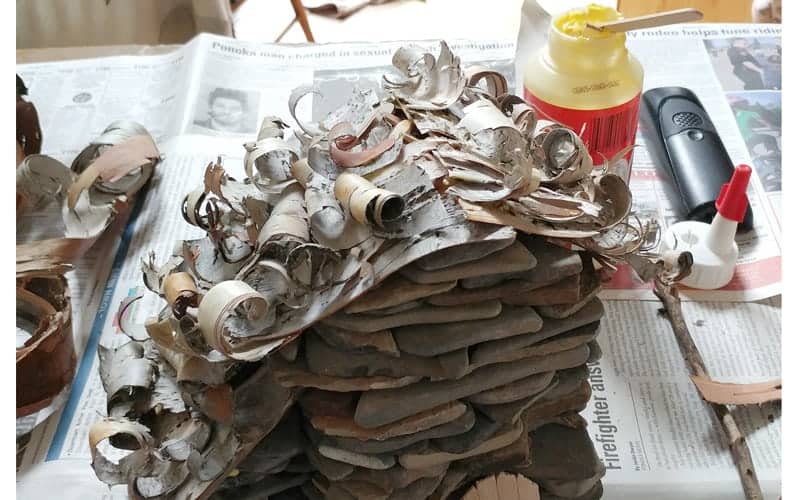
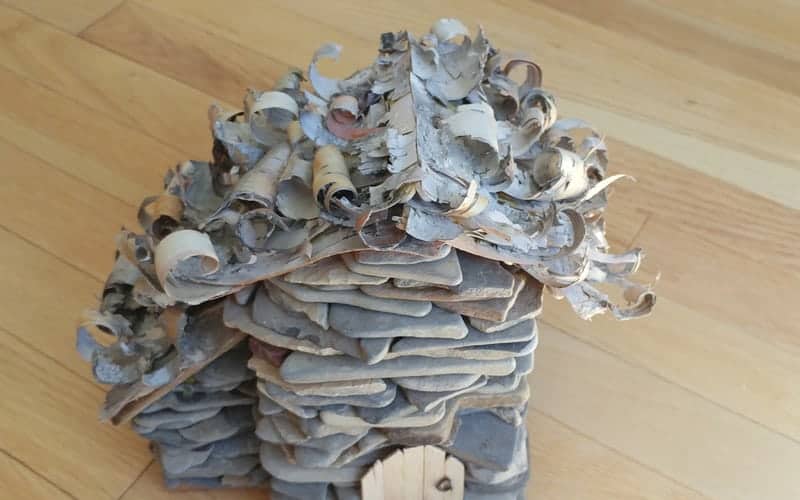
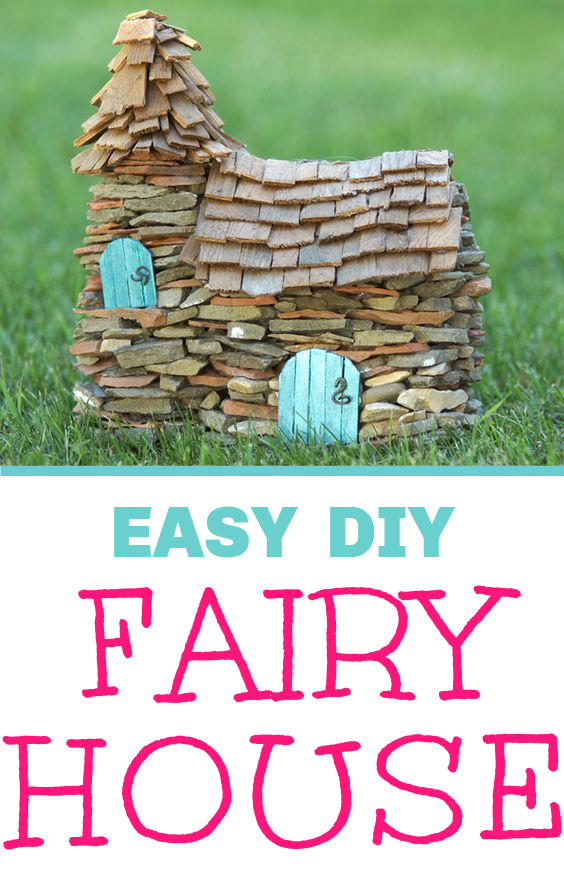
I wanted this house to be as natural looking as possible, so I chose birch bark for the “shingles”. (I have previously used old cedar shakes and cut them up with tin snips. But, you know, the fairies probably don’t have access to cedar shakes, so while I do love the way that looks… I figured I would try something different.
I tried sticking big pieces of birch bark on and it just looked ridiculous. I ended up pulling them all off… I got the best results from ripping the bark into tiny pieces and working from the bottom up. I used lots of curly pieces. I think these fairies are probably whimsical, so the curlier the better!
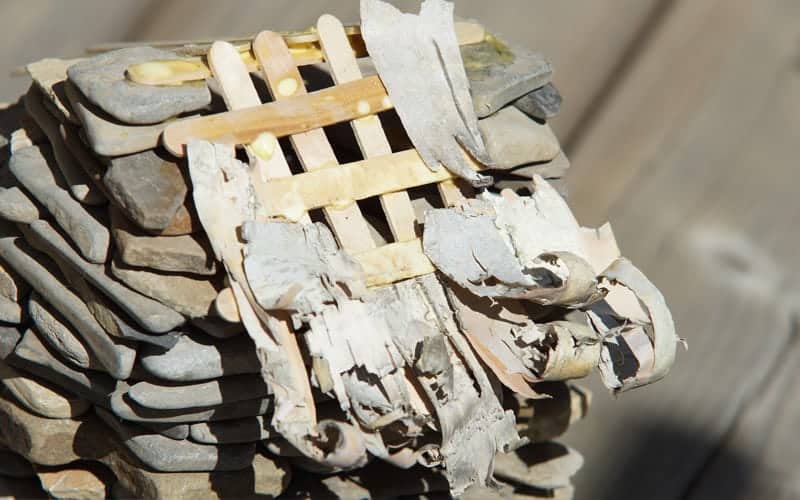
I wasn’t totally sure how to finish the top (ridge cap) off, because of the wonky-ness of the birch bark… so I made a “ridge cap” out of two popsicle sticks and glued tiny pieces to the sides. I’m pretty happy with the way it turned out!
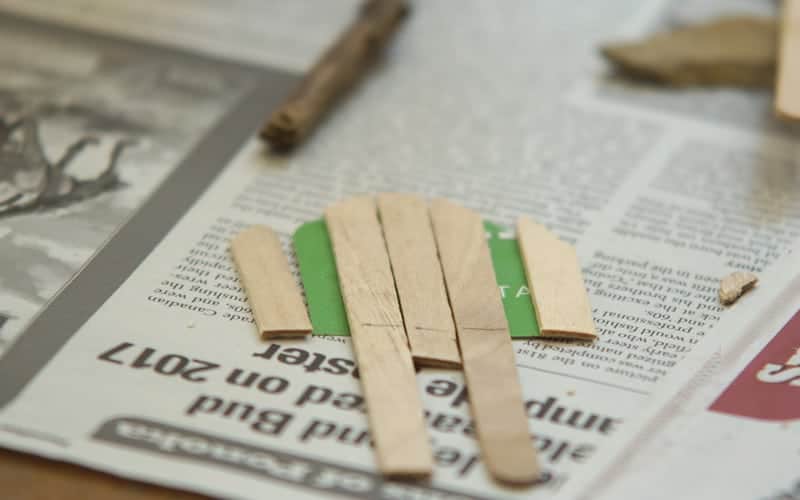
Build the door and “install” it to complete your DIY fairy house!
I just used the tin snips to trim some popsicle sticks into a “door” shape and glue them together.
In hindsight, I could have used more birch bark or twigs or something to make this even more “all-natural”.
And I should have used a tiny pebble or seed for the handle if I had been thinking. (I just used a little piece of random twisted wire.) Will have to change that.
Sometimes I paint the doors bright colors, because… fairies. I’ll probably still paint this one. I don’t have a purple one yet. (Colorful little doors are just one fairy garden idea I LOVE!)
That’s it – easy DIY fairy house… and it won’t melt into a puddle or flake apart.
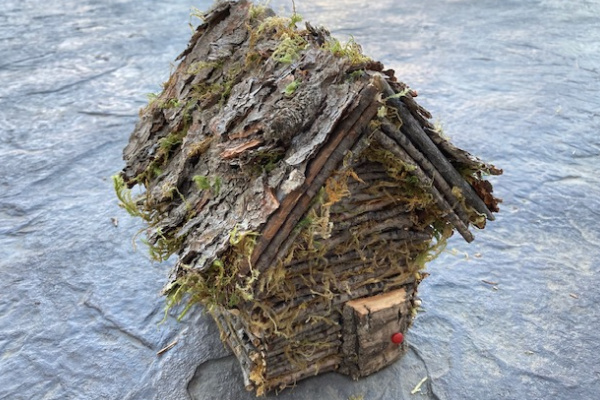
I recently made a little “log cabin” fairy house from twigs – also using silicone sealant for longevity – look how cute it is:
There are just SO many fairy houses I have yet to create lol.
Check out some of these SUPER SWEET Fairy Garden accessories to decorate your fairy garden:
- cute little fence (keeps out the hedgehogs I suppose?)
- tiny stone table
- THIS WOODEN TUB! EEK! (I need this!)
- mini rustic gardening tools (I’m going to make some like these.)
If you decide that this whole DIY’ing a fairy House is not for you, the Prettman’s have a lot of cute Fairy Garden supplies here.
On the other hand, if you LOVE building your fairy garden décor – like I do – here’s a great list of DIY fairy garden accessories to make!
You might also like:
How to Make a Washtub Fairy Garden
How to Make a Birdbath Fairy Garden
I’m so excited to put these little houses in my fairy garden and decorate it… and I’d love to see your DIY fairy garden house!
![]()
I spent a good amount of time looking for reasonable live fairy sized plants. They used to be reasonable at Walmart and was a little disappointed then I noticed after each Walmart post it said Hirts farm. I went directly to them and got many of the plants I needed for half price. By the way I love your stone house idea.
Oh that’s such a great tip! Thanks! I generally do go to my local nursery to find small plants (or propagate from plants I have already!) I’m glad you loved the house !
Love this – will start tomorrow. We live in glorious rural Ireland and the fairies are all around us, so they will love these….
I’d LOVE to see a picture of the finished product!
This is by far the best tutorial I’ve seen on stone fairy houses! Thank you for sharing! I was debating using hot glue but wondered about the longevity. Silicone is a perfect solution! Yay!
Aw thanks! Definitely don’t use hot glue lol. I have used it in the past for less “outdoor” houses, and it never holds up!
Another idea for roof singles are pinecone petals. (Not sure of their actual name) I use pliers to pull them apart and gardening shears to trim them to size. It’s a little time consuming, but looks awesome finished. I would include a photo but don’t see an option to do so.
I do have pinecone petals included here, but I agree they are an AWESOME fairy house roof material – I would LOVE to feature an image from you on this site… you can email one if you like, to [email protected] 🙂
Any tips on keeping fairy gardens tidied up once placed outside? Your creations are so cute and your instructions are well photographed.
I find that keeping them close to buildings helps a lot, and making them in pots that you can move when the weather is really bad is a good idea too. Use plants that don’t mind being pruned (like succulents or herbs!)