Fairy Gardening 101: How to Make a Fairy Garden
Check out our 10 FAVOURITE PLACES for finding the CHEAPEST fairy garden supplies!
I first started wondering how to make a fairy garden a few years ago. I’d seen so many darling fairy gardens on Pinterest and on friend’s blogs, I wondered how hard it could be?
Well, I’ve been pleasantly surprised to discover it’s pretty easy to make a fairy garden!
My favorite part of fairy gardening is that it’s open to interpretation. You can make elaborate fairy gardens covering a full bed in your yard or you can use a birdbath or large pot to make a patio-friendly fairy garden.
There’s something about fairy gardening that really appeals to my inner kid. It’s imaginative and creative. You get to make teeny tiny worlds and adjust them however you like. It’s a fun hobby to do with your kids, too—like building an outdoor dollhouse!
So, if you’d like to create your own magical fairy village but don’t know how to begin, this step-by-step tutorial will walk you through everything you need to know! Get ready for fairy gardening 101!
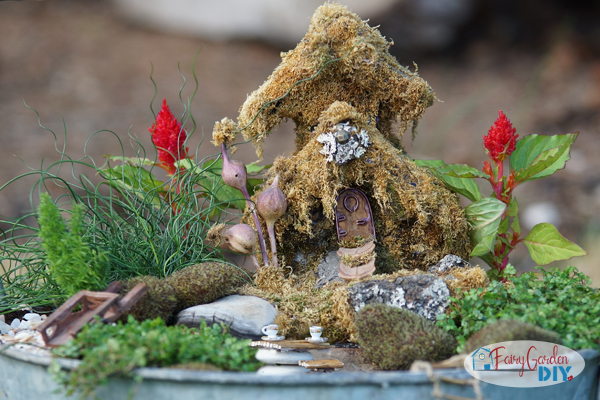
This post is about how to make a more involved fairy garden, here are simple tips on how to make a fairy garden for a child.
(THIS POST MAY CONTAIN AFFILIATE LINKS. YOU CAN READ OUR FULL DISCLOSURE POLICY HERE.)
How to Make a Fairy Garden Layout
Now, before I start breaking the process of fairy gardening down, let me just say, let your imagination run wild!
You don’t need to follow any hard and fast rules to create a gorgeous fairy garden with plenty of magic and whimsy.
(I personally imagine fairies would be quite whimsical. That also makes it easier to accept imperfections in my fair gardens LOL.)
You can use any materials you like!
You can make a tiny fairy home in a flowerpot or a hollowed-out log for one fairy, or build a whole village all around your yard. When you start fairy gardening, my advice is to do a little at a time and adjust as you go. If you plan to keep your garden outdoors-only, then you can change it up every year in the spring.
If you want an indoor/outdoor fairy garden, you’ll still be able to change and adjust with the seasons. The most important “rule” for making fairy gardens is to have fun! Enjoy the process and adjust as you go. If you’re ready to get started and need some guidance, begin by planning your layout.
1. Select Your Space
The first step for planning your fairy garden layout is to select your space.
Is there a low-traffic corner of your yard? A flower bed is a great spot because you already have plants springing up around your fairy houses (perfect for flower-loving fairies). The front yard is great if you want passersby to admire your fairies, but the backyard will protect your fairies from flying the coop.
Short on space? You can use a raised bed, a large planter, a repurposed birdbath, a washtub, a window box – or even something as tiny as a teacup for a fairy garden too! Fairy gardens make an excellent decoration for your porch and look adorable on a patio. The nice aspect of container fairy gardening is that you can bring the container indoors when the season is over and enjoy your fairies all year long.
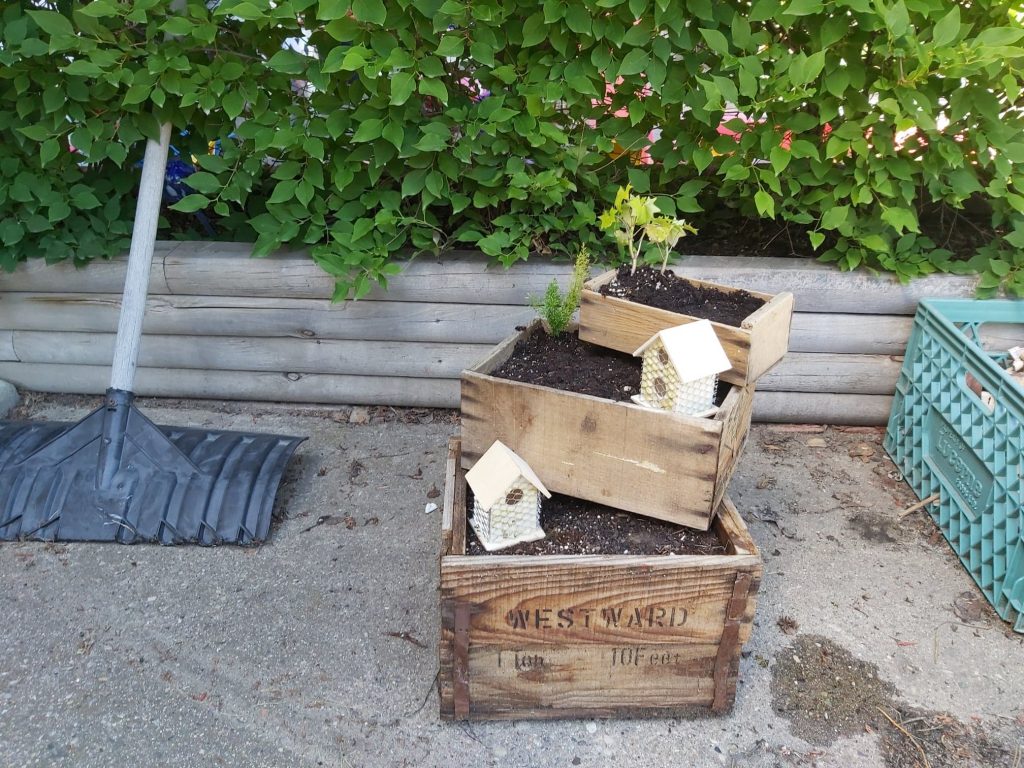
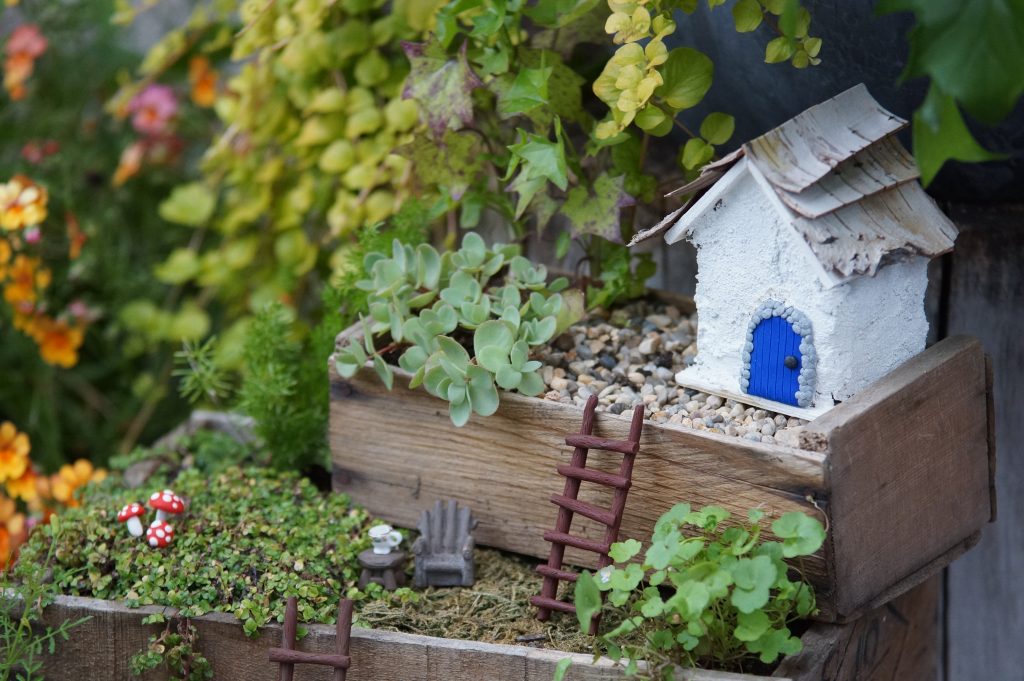
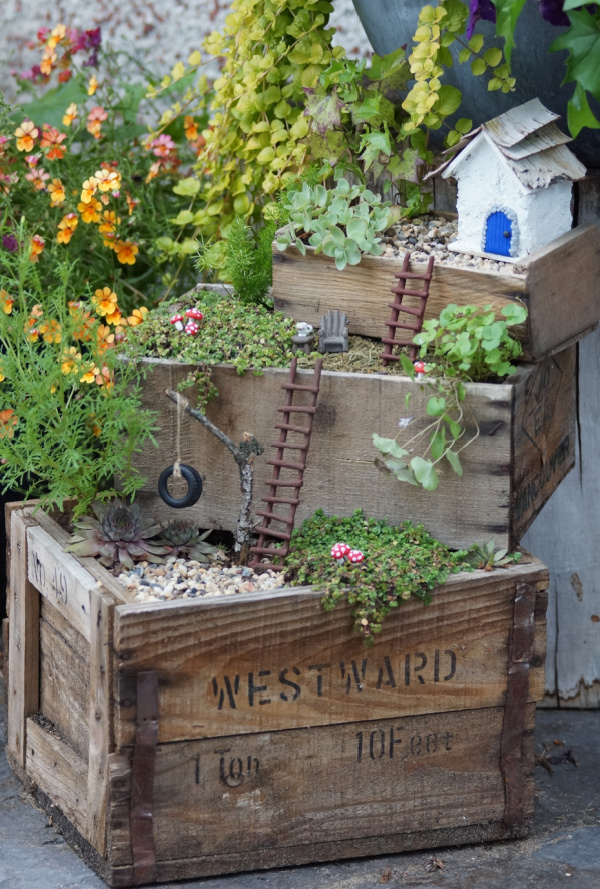
You can even plan to make your fairy garden multi-tiered! For the garden below, I had the wooden boxes from my grandpa’s estate sale, and I stacked them up to create a tiered garden.
I think a great container can add SO much to your fairy garden. Here’s some great indoor fairy garden container ideas, and a list of awesome outdoor fairy garden planters.
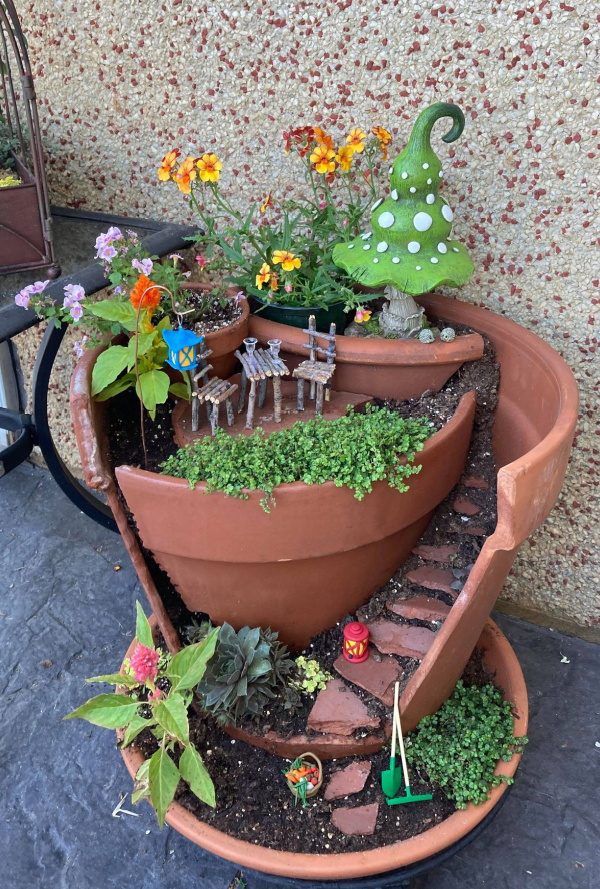
Another great multi-level dwelling idea is a broken pot. I just made this one:
2. Plan One Dwelling per 1-3 SF
Once you’ve selected your space, you’ll want to decide on the number of fairy dwellings you’ll want in your garden. To create a cohesive look, a good rule of thumb is one dwelling per every 1-3 SF. So, a small planter may only hold one fairy house, while a large flower bed could hold five or more dwellings.
As you can see in the photo above of the wooden boxes, I placed the houses in while I was planting to be sure I was reserving space for the plants.. and by the time I was done planting, I had already determined there was not enough room for 2 houses! (Not over crowding while building a fairy garden is crucial!)
You don’t want to jam too many houses in a small space, or you won’t have room for accessories (and those shy little fairies themselves). Give them some room to move around. It’s also cute to tuck surprise fairy houses throughout your yard. But if you want to create a dedicated fairy garden in one area, stick with one fairy house for every 1-3 SF of space. Odd numbers often look and feel the best.
(You can also choose to use NO fairy houses, like I did with the broken pot garden.)
Here’s a whole pile of fairy house ideas to inspire you, if you’re planning to make your dwellings!
3. Decide on a Theme (if you want)
When it comes to fairies, there are many different kinds! There are spooky fairies, flower fairies, medieval fairies, and plenty more. For lots of ideas, check out The Fairy Bible and the Encyclopedia of Fairies in the World Folklore and Mythology (this can be fun for kids who want to really get into the world of pretend). Classic fairytales and fantasy books are other excellent resources.
You don’t even HAVE to populate your fairy village with fairies! You can use dragons, gnomes, goblins, hobbits, and even animal figurines (perfect for boys who want to get in on the fun but find fairies a little too “girly”). If you plan to purchase your fairy houses, there is a wide variety of themes from natural (mushrooms, stumps, and gourds) to crafted houses and castles.
I personally like to NOT put fairies in my gardens at all, but that’s just me. (Sort of like they don’t let people see them, or something.)
4. Choose a Substrate
For a fairy garden, a patch of moss or creeping thyme makes the perfect substrate for your village.
In the garden pictured below, I used creeping thyme (my all time favorite for fairy gardens, as it easily drapes over the edge of planters), and some dried dollar store moss.
Most garden centers sell Irish moss, or you can transplant found moss from shady areas of your yard (moss needs plenty of shade) if you want real moss!
For sunnier fairy gardens, creeping thyme is an excellent option. Scotch moss has a soft, fluffy look with charming tiny white flowers (perfect for your fairies). Ground cover helps your fairy garden feel magical—like a tiny prairie or grassy Irish hill. (It also helps keep the fairy houses and accessories cleaner when it rains – otherwise, mud splashes up onto them!)
You can also choose indoor/outdoor friendly sheet moss, which is available in any floral department. Cut the sheets to fit your container. Sheet moss (and even AstroTurf) are easy to maintain and suitable for small children as well as indoor gardens.
If you’d prefer a desert climate, you can lay rocks out in lovely patterns and mermaid’s tears look like water.
Best substrates for fairy gardening:
- Irish moss
- Scotch moss
- Creeping Thyme
- Topsoil
- Sheet moss
- AstroTurf
- Sand
- Small pebbles
- Fish gravel
- Mermaid’s tears (floral marbles)
5. Plot 1-3 Plants Per Dwelling
There’s something about using real plants in a fairy garden that feels right to me.
I guess it’s why I favor DIY dwellings to the store-bought kind. I like to set up a fairy garden that looks like the fairies built it themselves out of items they found.
However, I realize not everyone has a green thumb, and if you’re starting out, it’s perfectly fine to use realistic faux ferns or succulents too!
For fairy gardens, you’ll want small plants that stay close to the ground.
Flowers are BELOVED by fairies (of course) and may bring in some real-life butterflies to your fairy village as well.
Taller tree-like plants (like foxtail ferns) look like mini pines, and succulents are a great way to add green. Aim for 1-3 plants per fairy dwelling to keep a nice mix.
Best plants for fairy gardening:
- Pansies
- Marigolds
- Lavender
- Foxtail Fern
- Monterey Cypress
- Hyssop
- Violets
- Shamrocks
- Nasturtium
- Impatiens (shade-loving)
- Petunias
- Sedum
- Polka-Dot Plants
- Stonecrop
- Coleus
- Burro’s tail
- Alyssum
- Air plants (for indoor gardens)
- Bonsai-style plants and fairy-miniatures
Here’s a complete guide to the best plants for fairy gardens, if you want more information!
6.Create a Path Between Houses
Once you’ve started to plot out your fairy garden with plants and ground cover, it’s time to do some “city planning.”
Again, you’re only limited by your imagination!
I find it’s nice to give the fairies a path through the village. This makes your fairy garden feel more cohesive and put-together.
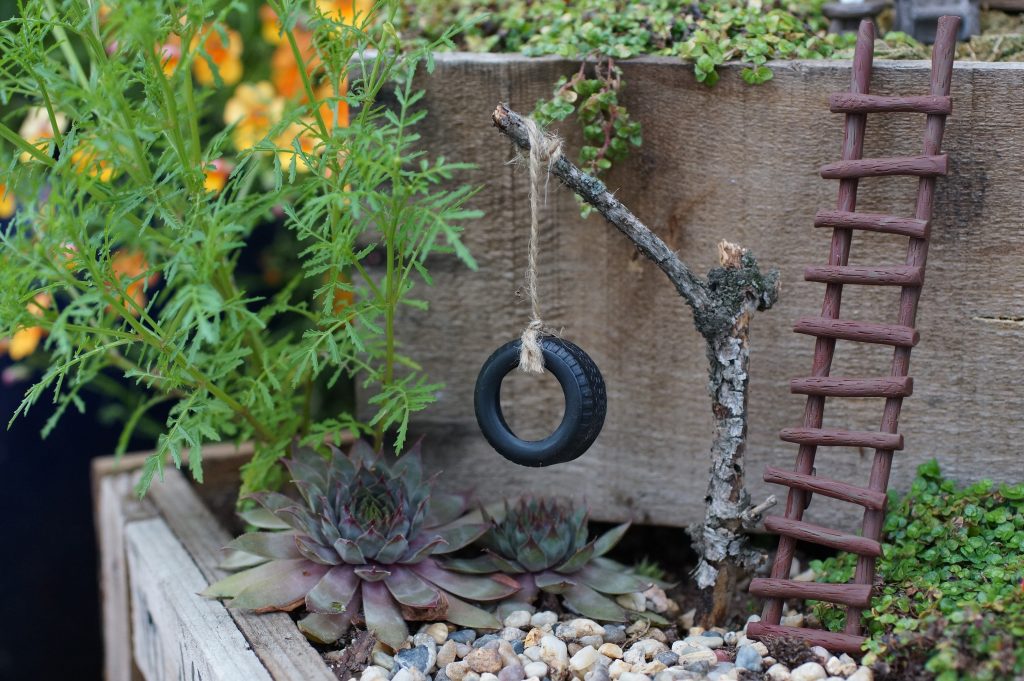
Using small stones in a single color works really well for creating pathways and roads in your fairy village. (For my garden, there wasn’t a ton of room for a path, but I think the ladders almost work as a path, drawing your eye up!)
You can use small rocks to make a wall and delineate “yards” in your fairy village. It’s fun to place the stones in patterns and place small steppingstones around the fairy garden.
Mermaid tears (floral marbles) and sea glass are great for creating the look of waterways. You may also want to add some human-sized steppingstones in your garden as well (so you don’t accidentally step on the fairies when you water your plants).
7. Decide on Your Village Plan (Store-Bought, DIY, or a Mix)
Now that you’ve almost finished with your fairy garden layout, it’s time for the fun part—choosing the houses and the fairies and accessories!
If you’re beginning, you may want to look for one or two inexpensive fairy houses to start your garden.
Some fairy gardeners prefer polished, store-bought homes. Others (like me) enjoy building their own fairy houses. It all depends on the look you like. I mix store-bought accessories with my homemade houses, and that works well for me!
This is a good time to check out fairy houses on Pinterest and Amazon to get some inspiration for your fairy garden.
This process can quickly become a little overwhelming (because there are SO many options out there). Remember, start with a few right now, set them up, and see what you prefer. You can always buy or build more houses as your fairy garden grows!
I love to create my own decor for fairy gardens. Here’s a GREAT list of DIY fairy garden accessories, if you should choose to decorate your garden with accessories you make yourself!
Depending on the type of fairy garden you choose (store-bought or DIY), follow the rest of the tutorial below to finish setting up your fairy garden.
How to Set Up a Fairy Garden (with Store-Bought Materials)
If you’ve decided to go with store-bought houses, there are SO many options out there! You can choose gourds, mushrooms, little acorns, or hobbit-houses. There are castles, log-cabins, and practically anything in between.
Here’s my favorite places for getting cheap fairy garden supplies!
Here’s how to start setting up a fairy garden using store-bought materials.
1. Start Simple
The first tip is to start simple! If you’ve made it this far, chances are you’re pretty sure fairy gardens are a great hobby for you. But there’s always the chance you start setting it up and realize it isn’t your favorite endeavor. Don’t get overwhelmed—start small.
Create a little fairy garden in a container or small patch of your yard this year. Then next year, expand a bit more. If you get it set up and a month passes and you want to add more—go for it! You don’t have to set it up once and then forget it. Fairies like variety and change!
2. Choose 1-3 Dwellings
Narrow your fairy houses down to 1-3 dwellings to start. Fairy houses come in all different sizes, depending on the brand. I recommend choosing one brand to start if you want to keep the size and style of your houses consistent. You can find houses with moving parts, LED lights, solar lights, and more.
I really love the look of Pretmann’s brand fairies and fairy houses. They have a very natural feel, and the detail is charming. You may prefer something brighter, spookier, or totally different. Hearthsong makes colorful, sturdy fairy houses that are (fairly) kid-friendly. Thomas Kinkade also has a collection of cottage-style fairy houses. Wayfair has hobbit-style homes, and Michael’s and Target sell fairy house collections as well.
3. Plan 1-2 Fairies per Dwelling
Next, it’s time to select your fairy garden occupants, a.k.a. the FAIRIES!
IF you want fairies, that is.
The same guidelines fit with the fairies because the options are all over the board. Stick with one brand to start if you want your sprites to “match.” Some folks don’t mind a mix-and-match look and even feel it adds more whimsy to the fairy garden. It’s really up to you and your personal preferences.
Pretmann’s is, again, a cute brand for fairies. The faces are really sweet and there are a lot of options. The fairies are painted well, with a lot of attention to detail. Most of their fairies come with a wire pick to help them stay in the ground (many other brands don’t). Florist wire can also help secure your fairies in place.
Of course, you may prefer to find fairies on Etsy or through a retail store like Michael’s or Hobby Lobby. There are so many options out there. Check to make sure your pixies can withstand outdoor weather before you put them in your outdoor fairy garden. Some handmade varieties are very delicate and might not hold up to water and rain. Resin and plastic hold up well outdoors.
Most fairies will fade a little in the sun, even if your garden is in a shady area. You may need to update your fairy garden with new residents each year.
4. Select Accessories
Now your fairy village is almost complete—it’s fun to add a few little accessories to really bring your fairy garden to life! There are so many fairy garden miniatures from lights and fences to patio furniture and bikes. Your fairies can take up all sorts of hobbies and activities. You can pick a theme or give each fairy their own identity and personality.
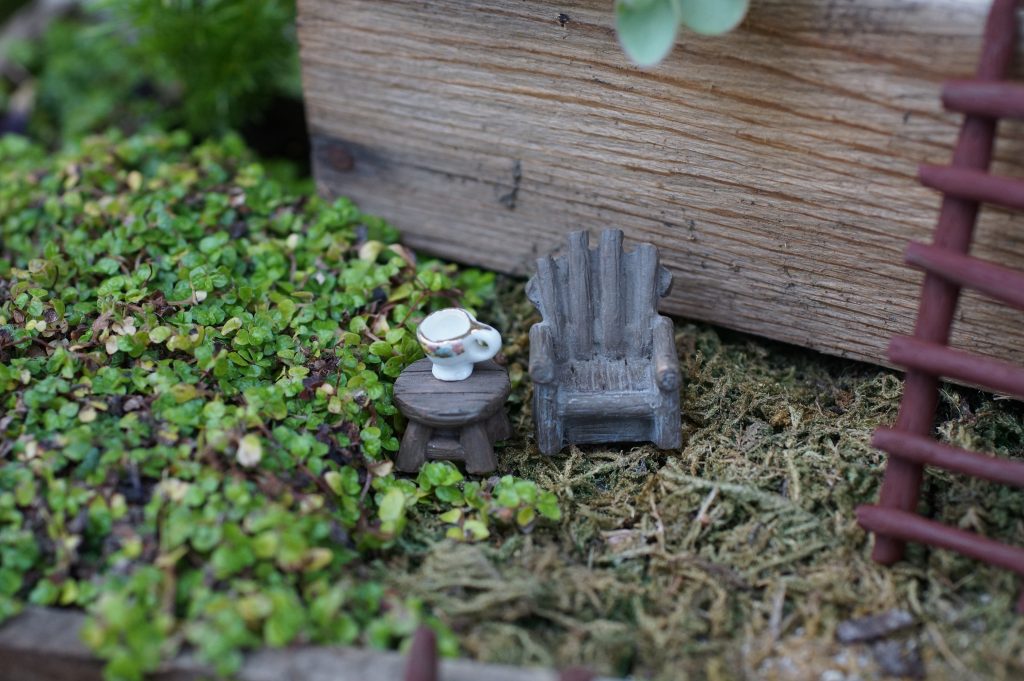
A sweet little chair, a cute firepit, or few tiny flowerpots are a great place to start. You may want to include some natural fairy decorations in your village as well. Some larger rocks, a few pinecones, shells, fossils, and decorative sticks add visual interest to your town and help your fairy garden seem like an active spot!
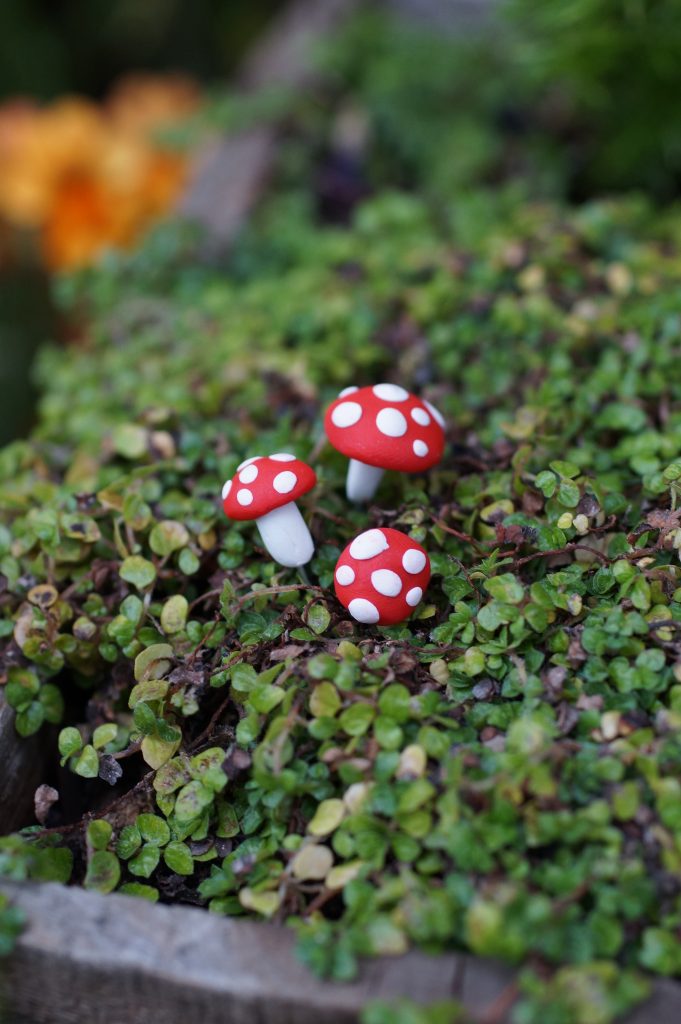
Very simple accessories, like the toadstools below can add SO much character and color! (I made the toadstools below from polymer clay, but you can also buy them on Amazon!)
How to Make a DIY Fairy Garden
Do you feel like you want to create a more “rustic” DIY fairy garden? Building your own fairy houses is a lot of fun and a little challenging. If you’re up for the task, you can start with items you probably have right in your own backyard.
True confessions time—the first fairy house I made didn’t turn out. Well, okay, it turned out, but because I used hot glue to put it together, it melted. My poor fairies were left in the heat with no shelter and a big sticky pile of rocks!
But never one to give up easily, I decided to try it again.
On my second attempt, I used silicone sealant, and it worked MUCH better! See:
In fact, my fairy house turned out to be adorable! I share this with you to let you know—building fairy houses may take some trial and error. The rustic look is part of the charm. After all, if the fairies were gathering materials to build houses on their own, they would likely look unique.
Related: How to Build a Faux Brick Fairy House
For the fairy garden made with the three wooden crates, we made these cute concrete fairy houses (from dollar store bird houses).
If you’re going to DIY your fairy garden, relax and have fun with the process. Experiment with the look you like, and don’t be afraid to add on (or rebuild) your DIY fairy houses whenever necessary!
1. Choose Your Materials
You can build your own fairy house like mine, using rocks and cardboard, or you can try a different material. I’ve seen adorable fairy houses made from overturned pots and even little doors affixed to tree trunks!
You can make a small sod house for your fairies with scotch moss and a cute door (don’t forget a chimney) or use pebbles to create a mini fairy castle. Your pixies may be happy living under a tree with no formal house at all!
2. Sketch Out Your Plan
When you decide on the type of dwelling you want to build, it may help you to sketch it out first. Your plan doesn’t need to be an architectural rendering, but sometimes getting ideas down on paper can help you see any gaps and think of all the materials before you begin.
Keep in mind, materials like bark or dried grass will deteriorate over time (and with weather). Houses made of cardboard may not fare well in the rain. When you put your ideas down on paper, consider any drawbacks of the plan. This planning step will help you avoid my hot-glue and rock mess!
3. Build One Dwelling at a Time
Building a fairy garden takes time. If you plan to make DIY fairy houses, you’re going to need to give yourself several hours (at least) to build each dwelling. Go slow and pace yourself. Build one home at a time.
Each time you build a fairy house, you’ll learn something new. You may discover that popsicle sticks make better doors than twigs. You may prefer small, flat stones to tiny pebbles. I would start with your smallest dwelling first. Build a cottage before you move on to building your fairy castle or cathedral.
4. Purchase or Make Accessories
For my fairy garden, I went with a hybrid of DIY houses with purchased accessories (like my cute chair I adore)!
Your kids may get really into making accessories for your fairy garden—tiny chairs made of bark, acorn cups, and walnut footstools. You can use household items, too, like marbles and wooden spools for a fun effect.
We made the tire swing below with a stick, some twine, and a tire we pulled off a $1 car from the dollar store.
We made the ladder from polymer clay.
If your kids are young, popsicle stick fairy garden accessories are usually a hit!
Many cute dollhouse miniatures can make great additions to your fairy village as well. Just make sure they’re outdoor-friendly, or they may not last too long. You should also know furry friends, like raccoons, squirrels, bunnies, and even pets, may invade your fairy garden occasionally (depending on where you live).
If you notice your accessories get scattered, florist wire can help you hold them in place.
5. Purchase or Make 1-2 Fairies per Dwelling
As for the residents of your fairy village—should you purchase or DIY? I’ve seen some very cute fairies made of polymer clay, feathers, and leaves. Pinecones, wool felting, and wooden beads make excellent fairy materials, along with bits of fabric, faux flower petals, shells, and stones. You can even paint rock pets (be sure to use a waterproof sealant) and build seashell creatures to live in your fairy garden.
The one caveat about making your own fairies is that they won’t last long outside. Unfortunately, most materials for homemade flower fairies aren’t water and sun-proof. If you enjoy making fairies and find it to be an entertaining, creative outlet for you or your kids, then I say go for it! If you feel sad to see your fairies wilting in the rain, then you may want to purchase a few durable fairies for your garden (and move your DIY sprites indoors).
You’ve Learned How to Make a Fairy Garden, Now What?
So, now you’ve made a fairy garden—the paths are set up, the flowers are planted, houses are “installed,” and the fairies have moved in. Now, what do you do to make the most of your adorable fairy garden?
Grow Your Fairy Garden Over Time
Whether you purchase your fairy village, make a DIY fairy garden, or choose a hybrid option, it’s important to note that your fairy garden will grow over time. Once you set up your first fairy garden, make notes about what you love (and what you’d like to change down the road) and adjust as you go along.
Giving your garden time to grow is essential (and part of the fun). Remember, a fairy garden is an ongoing project that can last many years. You may decide to change the theme next year. You may find some adorable fairy houses at a flea market and choose to create a neighboring village. You may build one house this year and decide to make two next time around. It’s an ongoing labor of love.
Take Photos of the fairy garden you’ve created and Share
Sharing your fairy garden photos is part of the fun of building a fairy garden. You can put pictures of your garden up on Instagram, take closeups of your fairies, and document the changes. It’s interesting to compare the way different flowers bloom and change the look of your garden during the growing season.
The photos also make a great point of reference for your fairy garden in the future. You may love the design and decide to replicate it next year. You may discover your fairies are in a strange spot in the yard (like your dog’s favorite potty place or too near the kid’s sandbox). Next year, you can reference the photos to plan and even move your fairy garden to a different spot.
Change Your Fairy Garden with the Seasons
Do fairies celebrate holidays? It’s up to you! You can decorate your fairy village for the 4th of July, back-to-school, harvest time, Halloween, and more! Imagine how cute it would be to create a haunted fairy village in October! Adding a few little touches each season is a fun way to change your fairy garden and keep it festive.
One easy way to change up your fairy garden is with lights. You can purchase little solar or battery-powered (outdoor-safe) fairy lights to help illuminate your display. The lights add a fun touch and are available in different shapes and colors to fit any season or occasion. You can also find glow-in-the-dark pebbles to light pathways around your fairy garden and create an ethereal effect.
Attract Visitors to Your Fairy Garden
Fairy gardens make your yard feel magical and special.
With all the flora, you may also want to attract fauna to keep your fairies company. Consider adding a butterfly feeder, hummingbird feeder, and setting up a birdbath to keep your flying friends happy. A simple saucer filled with floral marbles, water, and a slice of fruit makes a great butterfly feeder. You could even install a bee house!
Many of the fairy garden-friendly plants, like lavender, marigolds, nasturtium, alyssum, and thyme, are attractive to pollinators. Add some nearby bee balm, echinacea, daisies, poppies, or dahlias to attract flying friends. Birds, butterflies, and bees are drawn to bright flowers with sweet scents, which also make a perfect addition to your fairy garden.
When it comes to making a fairy garden, let your imagination run wild! I find that fairy gardening is such a fun, whimsical hobby that brings me a lot of joy. I feel like a little kid while planning out the fairy houses and laying out the different scenes. Not to mention that neighbors, friends, and especially kids just love the fairy garden. It’s like capturing a little bit of magic right in your backyard.
So, if you’re looking for a fun, easy way to brighten up your yard, try setting up a garden for the fairies! Please share your photos and stories from your fairy gardening experience. I’d love to see your ideas in the comments below!