DIY Polymer Clay Toadstools (for fairy gardens)
Toadstools are a quintessential fairy garden accessory, aren’t they?
Check out our 10 FAVOURITE PLACES for finding the CHEAPEST fairy garden supplies!
They are also SUPER easy to make with polymer clay – and you can make these DIY polymer clay toadstools in ANY COLOR, so if your fairies are extra whimsical, don’t feel like you have to stick to the traditional red! These are a great way to add color to your fairy garden if most of the plants you have chosen are green!
You can also make these fairy garden toadstools any size, so regardless of if you’re placing them in a tea-cup or a wheelbarrow or a huge garden, you can build them to size.
(THIS POST MAY CONTAIN AFFILIATE LINKS. YOU CAN READ OUR FULL DISCLOSURE POLICY HERE.)
I had honestly never made anything out of polymer clay but I knew I wanted to get into making my own cute fairy garden accessories (because let’s be honest, if you develop a fairy garden addiction like I have, those cute tiny things can get kind of expensive), and polymer clay seemed like it would be a lot of fun (AND IT IS!).
(Update: I’ve since made PLENTY of things from polymer clay and they are all SO FUN – here’s DIY polymer clay succulents, and tiny vegetables, and even ladders!)
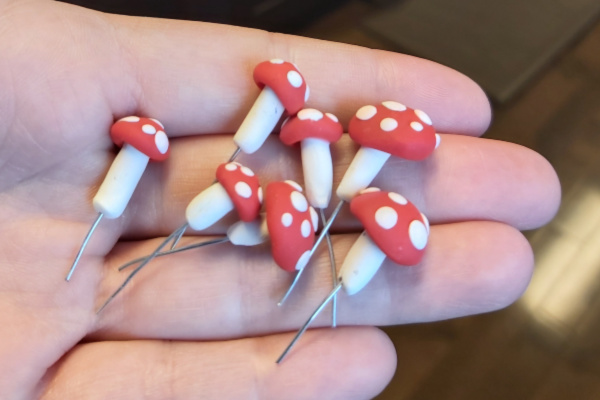
Here’s what my finished toadstools looked like – these only took about 15 minutes to make (and another 15 to bake). These would be easy to make with kids!
I was SO happy with the way they turned out!
Making these DIY polymer clay toadstools was a lot of fun, and I’ll show you step by step how I did it in the pictures below.
Supplies you will use to make polymer clay toadstools:
- white polymer clay
- red polymer clay
- (or any other colors of clay you’d like to use)
- craft wire (could substitute stick pins)
- ball tool (or marbles)
- liquid bakeable clay (or white glue)
1) Choose your colors!
Remember, you can make the toadstools in any color!
I personally just wanted to stick to red and white for this batch but I plan to do some bright blue, yellow, green and pink soon! (I’ll add a photo when they’re done.)
2) Create the stems
I rolled tiny logs of white and inserted short pieces of craft wire into the centers of them. (I wanted to be able to place the toadstools into the dirt of the fairy gardens).
I wasn’t sure if the wires would hold in place after baking, but surprisingly, they seem to be solid! (I had figured if they came out I would just put glue on and re-insert.)
![]()
3) Create the mushroom cap shape
For this, I used a ball tool (you’ll want on of these on hand – or even an assortment of different sized ball tools, if you’ll be creating many things with polymer caly) and pressed a little ball of red clay over the top of it.
Because I have many sizes of ball tool, I made smaller mushroom caps and slightly larger caps, shaping them over different sized balls.
If you don’t have a ball tool, you could use literally any tiny little round thing, even a marble would work! (Although it might be more difficult to hold.)
I didn’t care if my mushroom caps weren’t perfectly shaped. My fairies don’t need perfection, and I love that about them.
![]()
4) Add the toadstool spots
So I’m sure there’s an actual name for the spots on a toadstool, but I sure don’t know what it is. Toadstool spots works for me…
I pinched off tiny specks of white clay and pressed them onto the mushroom cap. (You’d be surprised how tiny I mean. Start small and you can add more if your spots aren’t big enough, but I bet they will be.)
I noticed that if I’d been working with the red, the dye on my fingers sort of stained the white clay, so I used a baby wipe to wipe my fingers after creating the mushroom caps.
Go ahead and add any random number and size of spots – try not to make things too predictable or symmetrical!
![]()
5) Gently pry the mushroom cap off your ball
You have to do this a little lightly – if you squish the edges up too much it really can lose resemblance to a mushroom cap.
I didn’t mind a little squiggle here and there, but for the most part, I tried to help them retain their shape!
6) Secure the cap to the stem with a drop of liquid clay
It’s entirely possible that the caps and stems would have stuck together after baking just fine, but it seemed unlikely to me, so I placed a drop of liquid bakeable clay into the mushroom cap and then stuck the stem inside.
I did push the wire through into the cap, but I was careful not to push it THROUGH the cap. (Although if that does happen, cover it with another white spot).
If you don’t have liquid bakeable clay, I might bake the cap and stem separately and secure together with white glue when they are cooked and cooled.
![]()
7) Bake according to your clay package instructions
I used Sculpey for these and it said to bake at 275 for 15 minutes for every 1/4 inch thickness… so I just baked them for 15 minutes, and that was perfect.
![]()
I just LOVE how these DIY clay toadstools turned out!
You might also like:
How to Make Polymer Clay Lanterns
How to Make Polymer Clay Fairy Doors
Thank you so much for this information. I really enjoyed your work.
Skip