How To Make An Indoor Fairy Garden
Maybe you live in an apartment? A condo? Perhaps you don’t have a garden, or you just don’t have a green thumb?
Check out our 10 FAVOURITE PLACES for finding the CHEAPEST fairy garden supplies!
If you prefer gardening indoors, you can still enjoy the charm of fairy displays. You can create an indoor fairy garden – this is a great DIY project that’s fun for everyone!
Best of all, learning how to make an indoor fairy garden is easy!
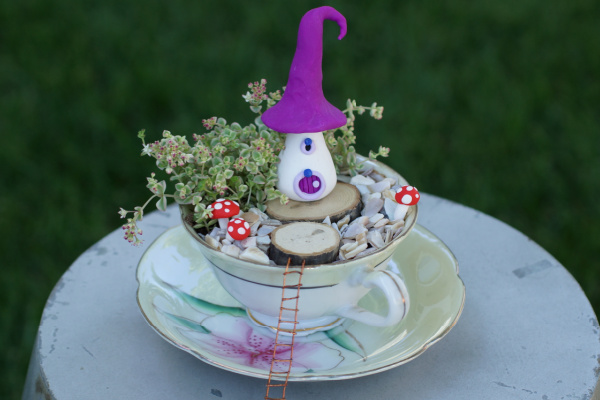
You can go as simple (and tiny…say… teacup-sized, like the one pictured below) as you like to just brighten up a corner – or you can get creative with the process and really let your imagination run wild.
Fairy gardens of all types are a great family project. Kids love working on the small fairy houses, arranging, and playing with the fairies. Think of it as a magical garden dollhouse!
Delight guests and your family with a charming indoor fairy garden. If you’re ready to learn how to create an indoor fairy garden, here are the steps to follow for your setup.
(THIS POST MAY CONTAIN AFFILIATE LINKS. YOU CAN READ OUR FULL DISCLOSURE POLICY HERE.)
Why Create an Indoor Fairy Garden?
Fairy gardens started to gain popularity a few years ago. If you visit a botanical garden or even explore your neighborhood, chances are you’ll find a few fairy friends nestled throughout the greenery. Look for little doors on trees, charming fairy houses set up amongst flowers, or cute window displays in vacation towns. It seems everyone loves fairies!
But if you don’t have a yard of your own or you aren’t an avid gardener, you may wonder how to create an indoor fairy garden you can enjoy. Is it still as charming to have whimsical fairies in the house?
Absolutely!
Setting up an indoor fairy garden is a great way to brighten up a corner. Fairies add life and joy to your houseplants and they add a touch of magic to a terrarium. Pixies are an adorable and imaginative addition to any décor.
A great aspect of indoor fairy gardens is that they’re often small vignettes. You can create several fairy-scapes around your home. Put fairies in a table centerpiece or add charm to your kitchen with a fairy scene in a coffee cup. Turn a window box into a fanciful diorama with a few fairies.
Fairies are a great way to showcase your houseplants and brighten up dish gardens. They brighten a windowsill and look darling in a china cabinet. I love going to a home and seeing little touches of whimsey sprinkled throughout the house. It feels magical when you discover a fairy peeking out of a plant or hidden beneath some greenery.
You can put together an indoor fairy garden in almost any container. It’s an opportunity to let your imagination shine. Indoor gardens don’t require special protection from the weather, so your fairies and accessories can be more delicate than the outdoor variety.
Because I often prefer to make my own fairy houses, I’ve discovered (through trial and error) that not all materials are durable for outdoor use. One of my fairy houses melted in the sun thanks to the hot glue I used to assemble it. With indoor fairy gardens, you don’t need to worry about your fairies sustaining a “natural disaster” (other than a curious child, kitty, or puppy).
You can change your fairies with the seasons to match your decorations. With an indoor fairy-scape, you can use electric lights, battery-operated accessories, and delicate paper materials to decorate. An indoor fairy container garden gives you a lot of freedom to have fun!
If you’re ready to set up your indoor fairy garden, here are the steps to create an adorable indoor fairy scene.
Step 1: Select a Container for Your Indoor Fairy Garden
Selecting the container and location for your indoor fairy garden is the first (and perhaps most challenging) step. Of course, there are MANY charming ideas for simple fairy container gardens in pots.
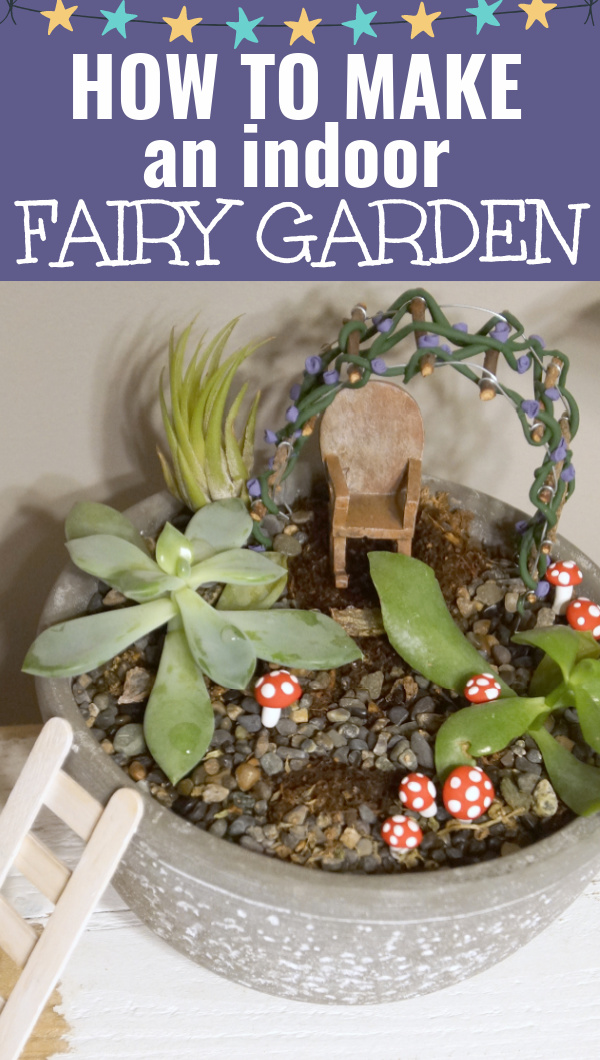
For the garden pictured above, I just used a succulent pot that had a few plants in it already! Built for plants, pots are a great default choice and perfect for beginners.
But once you’re ready to branch out, it can be fun to explore some outside-the-box choices.
An oversized coffee cup or a tiny tea-cup makes an adorable home for your fairies. A terrarium scene practically begs for a fairy for additional whimsey. Upcycle an aquarium with plants and fairies or create a desert scene in a succulent or cacti dish garden.
Speaking of upcycling, look at antiques for endless inspiration. Container fairy gardens are perfectly at home in refurbished wagons and washtubs. You may find a beautiful mixing bowl that would make a perfect fairy home. A lantern, a shadowbox, or a cake stand can all become container ideas.
If you’re looking for container inspiration, don’t miss our post “Indoor Container Fairy Garden Ideas,” where you’ll find all sorts of creative examples.
Step 2: Decide on the Theme
Once you’ve decided on a home for your fairies, it’s time to pick a theme. The location of your indoor fairy garden may inspire you. For example—a kitchen display may lead you to decide to decorate your fairy garden in culinary-related accessories or teapots. A bookshelf may be a perfect spot for a literary fairy to read (fairytales, of course).
Homes with modern décor may want a sleek terrarium or a desert dish garden for their fairy home. Farmhouse décor looks perfect with DIY fairy homes and upcycled antiques. If your style trends toward the Bohemian, you may find any avant-garde mix of fairy décor fits right in.
You don’t necessarily need a theme for your indoor fairy garden, but it can help guide your choices as you set up your fairy display and build out the idea. Do you prefer a medieval castle scene? A spooky haunted fairy village? Charming window gnomes caring for woodland flowers? Hobbits? Or do sweet flower fairies steal your heart?
Choose the theme to help you shop if you choose to purchase your fairy houses. A theme can also help you find the right materials and groundcover for your containers.
Step 3: Select a Substrate
What will you use as the base for your fairy garden? There are many substrate options:
- Dirt
- Sand
- Rocks and pebbles
- Dried moss
- Sheet moss
- Synthetic grass
- Floral foam
- Aquarium rocks
- Sea glass
The substrate will form the base of your fairy display. If you plan to use live plants in your fairy display, then you will need to use dirt. If your container has drainage holes, you can start with the soil. If your container doesn’t have drainage holes, begin by putting down a layer of pea gravel or small rocks to create a proper drainage system.
On top of the gravel, a layer of activated horticultural charcoal will help prevent root rot. Then add dirt on top of the charcoal. Good quality potting soil is a must for healthy houseplants. Once you’ve layered in the dirt, you are ready to add your plants. Note that if you choose succulents or cacti, you should use a specially formulated potting soil for those types of plants.
We’ll go over plant selection next, but whatever plants you select, you’ll add them to your pot. Leave enough space for your fairy houses or your fairy display. You can top your display with dried moss to create a grassy feel. Use aquarium rocks, sea glass, or small pebbles to decorate your fairy garden.
Should you use faux plants in your fairy display, you can simply fill your container with floral foam to create a base. From there, you will add a layer of sheet moss, synthetic grass, or dried moss of your choice. Faux plants usually come with picks that help them stay in place. Again, be sure to leave space in your arrangement for your fairies!
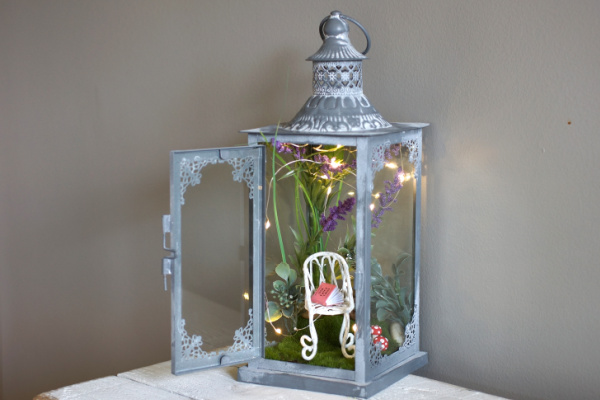
In this lantern fairy garden, I just used fake moss + fake plants:
Step 4: Select Fairy-Friendly Plants
So, what plants should you use for your indoor fairy garden? Well, the options for indoor plants are vast. Seek out flowering plants like lipstick vine, Christmas cactus, or violets. Succulents are also a popular choice for indoor fairy gardens.
Small cacti are adorable in a mini fairy display. Polka dot plants are easy to grow and quite charming with their tiny leaves and spotted patterns. Bonsai trees and dwarf trees are also quite stunning in a fairy-scape but are a little fussy. For gardening beginners, look for hearty plants to start.
A word on the popular “miniature” plants you often see for sale for fairy gardening—these are usually seedlings for larger plants. Often, they’re more expensive and less hearty than the slightly bigger 3-4-inch potted varieties. Look for houseplants with smaller leaves to look appropriate in your garden. Herbs are a great choice.
If you’re looking for fairy garden plant ideas, don’t miss my post, “The Best Plants for Fairy Gardens,” where I go through the definitive list of ideal fairy plants (including faux and dried options).
Step 5: Choose Your Fairies
With your plants in place, it’s time to pick your fairies! With indoor fairy gardens, you get more flexibility and customization. You can DIY your own flower fairies made from silk flowers, pipe cleaners, polymer clay, and bits of fabric.
You can also purchase delicate handmade fairies on Etsy or eBay. There are some adorable options out there and they’re so creative! I recommend spending some time exploring the world of choices because you’ll definitely get inspired.
Of course, there are many factory-made fairies available at craft stores and online. I really like Pretmann’s fairies on Amazon. They’re engaged in many different activities like reading, playing with animals, or gardening. They’re painted really well and they’re durable. You could even purchase factory-made fairies and repaint or customize them to suit your display.
Remember—there are no rules with fairy gardening. You certainly aren’t limited to JUST fairies (or just one type or brand of fairies either). Sometimes a mix of different fairy friends can look eclectic and charming. You could use gnomes, goblins, dragons, and other fairy-like creatures in your indoor fairy garden as well. It’s all about finding fairy garden inhabitants that make you happy.
Step 6: Decide on Houses or Accessories
Now that you’ve got your indoor fairy garden set up, you can decide on houses and accessories. If you’re using a small container for your fairies, you may not want to include a dwelling in your display. You can make a swing, a bench, or a little table for your fairies instead.
On the other hand, creating fairy houses is part of the fun of fairy gardening. I LOVE making my own fairy houses (check out my tutorial for an easy DIY pebble fairy house and a cute brick fairy house). There are also plenty of houses out there for purchase. The options are practically ENDLESS.
As with outdoor fairy gardening, you’ll want to follow the guidelines of one house per square foot or so. Add space, so your houses don’t feel too cluttered. Several houses in one small pot may be too many. A wagon or shelf may have room for 2-3 houses and accessories, so play with your space and get what feels best to you. In decorating, odd numbers often “feel” better than even.
With indoor fairy villages, you can add little paths and other touches that aren’t as feasible outdoors. You can use a small dish to make a pond. Glue pebbles together to create a path. Add silk or dried flowers to brighten up your greenery. If you like, you can add small dollhouse miniatures to your fairy display and really make it your own. Without worries about the weather and water, you’re free to use any materials you like to create a beautiful indoor fairy garden.
Step 7: Add Extras (Lighting, Water, and More).
For a stunning effect, add lights to your indoor fairy garden. You can find small battery-operated streetlamps, fairy lights, and miniature Christmas tree lights. Lighting will add an extra layer of whimsy to your indoor fairy garden. For fairy displays in containers like jars, cloches, or lanterns, lights look particularly beautiful and create a “captured fireflies” effect.
Many fairy houses light up, running on solar or battery power. For indoor fairy gardens, look for homes that run on batteries. You won’t need to worry about them getting damaged by weather and they really breathe life into your display.
You can create waterways with small pieces of beach glass and aquarium rock or even real water. Consider using a small meditation fountain to create a waterfall for your fairies! You could also use resin to create water-effects in small containers if you would like a reflecting pool or pond.
Step 8: Continue to Update Your Indoor Fairy Garden
Once you’ve created an indoor fairy garden, keep going! You can make multiple fairy containers to place around your house, or you may decide to keep one display but change it out with the seasons.
Some fairy gardeners transition their outdoor fairies to indoor displays when the weather gets cold. If you’ve put your sprites in an indoor/outdoor planter, this is a great idea. You can enjoy your fairies all year round. After a few months in the summer sun and weather, the outdoor fairies may need a little refresh, but cleaning them up and touching them up is a fun project as well.
Autumnal fairy displays are really fun to create. You can add small headstones, spooky cobwebs, autumn leaves, and colorful bits of dried hay to make your village feel Halloween-ready. Gourds, feathers, and acorns are all charming fall-touches for your fairy garden as well.
For the holidays, decorate your fairy display with each season. A layer of snow and snowy animal friends look especially sweet in the winter. Add holly, bittersweet, or touches of evergreen for a festive update to your fairy garden. Holiday lights are always magical, but in a fairy garden, they become extra special. You could even add a fairy door to your Christmas tree!
In the spring, you can have fun with flowers (dried, silk, or real). Add cut flowers in small vases arranged in amongst your fairy garden. I always like to add a little more color in the spring. Fresh greenery and a few new accessories are always a great idea as you “spring clean” your fairy garden.
Creating a fairy garden, whether indoors or out, is a fun and festive hobby. You don’t need to limit your fairy gardening to the summer months. When you learn how to create an indoor fairy garden, it opens up a whole new world of options.
Once again, the biggest rule of fairy gardening is to have fun and be creative. There’s no right or wrong way to set up an indoor fairy display.
Let your imagination go and see what happens!
So how do you secure The fairy houses the fairies and accessories do you glue them down what do you do I’m confused on that
For the most part, I just set them in! Since it’s indoor, it doesn’t have to withstand weather or creatures, so I don’t worry about securing them!